Sunday, December 23, 2012

Tartine Semolina Bread


I made this just a week after my first Tartine bread, and am only just now finding a few minutes to write about it.  This bread was not as astounding as the first Tartine effort (although still quite good), and, looking at the pictures, I think I can spot several reasons why.


First, the semolina flour was coarser than I would have liked.  The Semolina Bread recipe does call for semolina flour - not surprisingly - but I remembered too late that Rose's semolina recipes all specify durum flour:  made from semolina, but lighter and finer.  I think that would have been better.


Second, although this bread method does give you large spans of unattended time, you really have to think through the timing, and you can't just run off mid-bread.  The initial rise requires "folding," which is this bread's kneading equivalent, every half hour.  And Robertson says you can't rush this period.  Unfortunately for me, I gradually realized that I was going to have to rush it a little because I was going to be gone from the house for a few hours mid-afternoon.  Going through the timing in my head, I concluded that I was either going to have to end Phase 2 after just 3 hours (the minimum time), or I would end up putting the bread in the oven at midnight.


And, although I was surprised to see that my starter was very exuberant (after the first bread, I started keeping it in the refrigerator and feeding it only weekly or as needed for bread), three hours still wasn't long enough for the first rise.


Third, I opted to use a mixture of sesame and poppy seeds only on top of the bread, while the recipe calls for those seeds, as well as fennel seeds, in the bread as well as atop the loaves.  I like fennel, but I didn't want two loaves of fennel bread--it's just too limiting.
Only as I write this does it occur to me that I could cut the recipe in half.  Duh.  I often double recipes, but I so rarely halve them that I just didn't think about it.  Making only one loaf at a time will also decrease the time spent on the bread.  Anyway, I think the bread would have been more flavorful if I'd incorporated some seeds into the dough, especially since most of the topping seeds fell off.

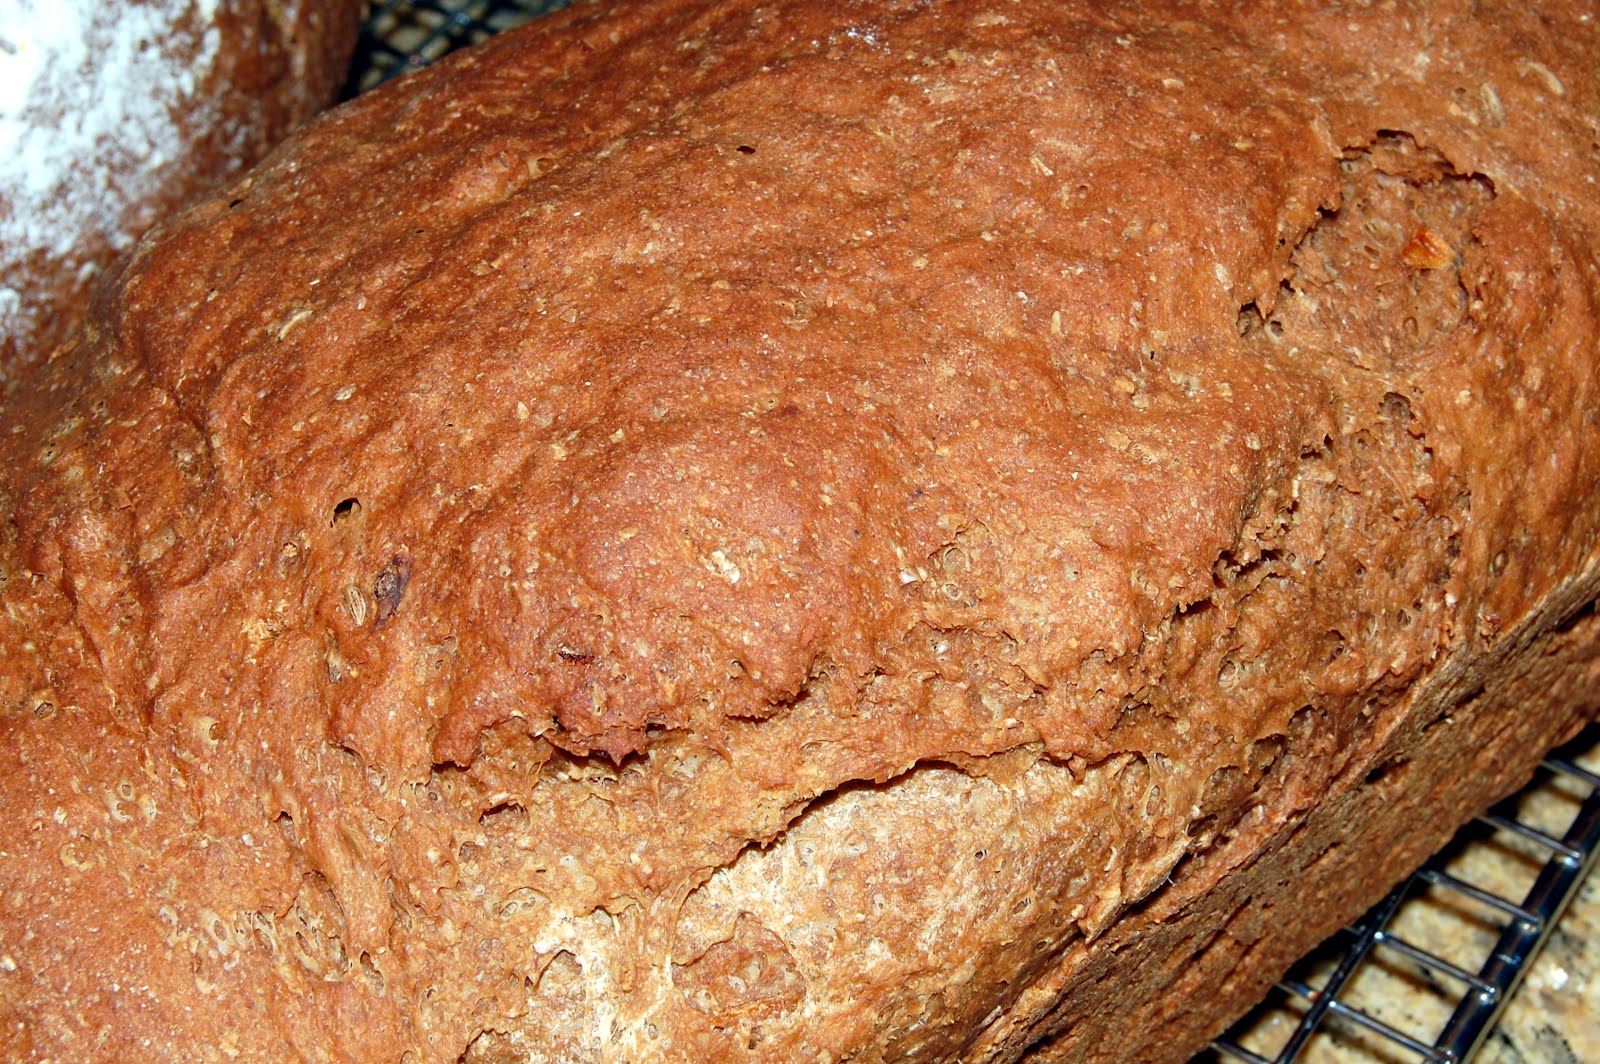
Finally, the step where you plop the bread dough into a burning hot pan didn't go well this time.  With both loaves, the dough didn't settle neatly into the pan, resulting in an uneven loaf.  Well, I suppose this isn't serious, but you'd like the bread to be beautiful rather than misshapen.


Jim, bless his heart, was trying to take pictures that didn't reveal that one side of the bread was an inch taller than the other side, and one side had a little ledge where it stuck to the side of the pan.  But you can see the objectionable shape in this photo.


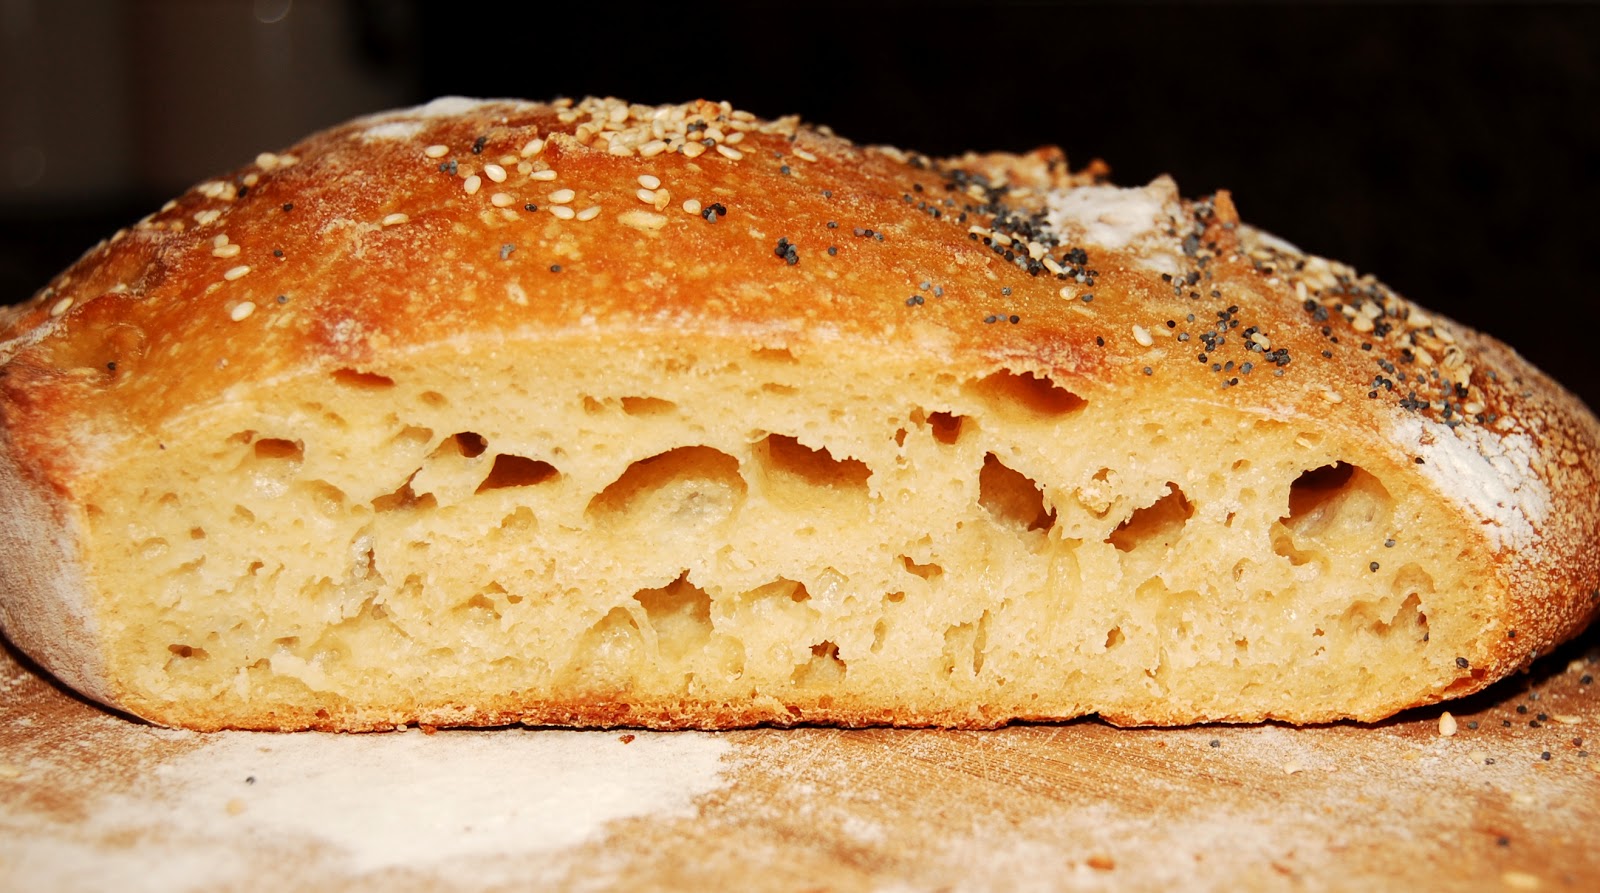
You can also see it in this picture, which shows that the texture of this bread is not as good as in the first loaf.  I think this is because I had to rush the first step.  (And remember that by "rush," I mean that it only sat around for 3 hours.)

Am I discouraged?  I am not.  But I am looking for a day where I have nothing to do but to check the progress of the dough in the first rise.  A lazy sort of day.  A don't-rush-me sort of day.  I hope I'll have one of those in January.  Which sounds like a fine resolution to make, and one that's more keepable than my standard "eat less, exercise more" vow.


Sunday, November 11, 2012

Tartine Bread: Bread at Last!

This is a really wonderful bread, and actually not all that difficult, but it does require you to go through over 30 pages of instructions, including photographs. But, as with so many recipes, once you've done it, you see that it's not nearly as hard as you thought it would be. It starts the night before you bake, when, curiously (to me anyway), you dump out all the carefully cultivated starter except for one tablespoon. That's not even enough to cover the bottom of the bowl. I always thought the rule of thumb for starters was to discard half, but the Tartine method is much more profligate. This is what I started with:
Next, feed with water, whole wheat flour, and bread flour. This is the same thing as before, except this time we measure: 200 grams of water and 200 grams of flour. The test for whether the leaven is active? See if it floats in water. (Isn't this the test they used for deciding whether you were a witch? If you floated, you were a witch. If you sank, you weren't. Unfortunately, you were dead. But righteously so).
My leaven floated. Hooray! I love to do well on tests.
The leaven, flours (mostly white with a little bit of whole wheat) and water are mixed together. The Tartine way is to mix it with your hands. I think that Chad Robertson must have loved playing with clay when he was a kid, because he thinks you should get dough on your hands on any possible occasion. I used my KitchenAid to mix the dough, but this was the only time my sturdy mixer got even a bit of a workout. This bread isn't kneaded, as you'll see; it's only folded.
But wait! After I mixed it in the KitchenAid, I realized that the next step was to add the salt and a little more water, and - of course - mix it by hand. This time I decided to be a good sport about it.
Next step: into a big bowl. Preferably clear plastic or glass, but I used my regular earthenware bowl. Instead of being kneaded, the dough is folded at half-hour intervals for the upwards of four hours that it undergoes its first rise, or "bulk fermentation." It was a chilly day in Minnesota, and the dough should be at a "constant temperature between 78 and 82." My kitchen will not be 82 degrees anytime after August. But luckily for me, I have my trusty folding bread proofer. I set the proofer for 81 degrees. Otherwise, it would have taken all day for the dough to get to its next stage.
It's not easy to determine when the dough has finished its first rise. It doesn't rise that much, so the more usual test of checking to see when the dough has doubled in size is of no help. Instead, you have to look for more subtle clues. Has the dough started to get "billowy, soft, and aerated with gas?" Do more "air bubbles form along the sides of the container?" Are you realizing that if you don't move on, you'll be fooling around with this bread dough at midnight? (That last test is not in the book.) I moved on after four hours and twenty minutes. I think the dough was more billowy, but I'm honestly not sure.
Next, divide the dough (the standard recipe for Basic Country Bread makes two loaves), and shape each one into a round. Let them rest for 20 to 30 minutes. In bread lingo, this is known as a "bench rest."
The dough is then shaped again, using a series of folds. Then it rests again (Bench rest #2?) Next step: make a 50-50 mix of rice flour and wheat flour.
Why rice flour? Well, I'm assuming that it has superior non-stick properties, since we're obviously not dealing with a gluten-free product here. This mix is used to dust the towels that line the baskets or bowls in which the dough makes its last fermentation, or "final rise." This takes another three to four hours at warm room temperature. Or, if you're tired of playing around with the dough, you can put the baskets in the refrigerator, which slows the fermentation, and deal with it tomorrow. "After 8 to 12 hours [in the refrigerator], the dough will develop more complex and mildly acidic flavors." I decided just to forge ahead.
I stacked the two baskets in the dough proofer, and moved them from top to bottom every hour or so. At last--some nine or ten hours after I started in the morning, I was finally ready to bake a loaf of bread.
I don't have a good picture of this part of the process because it's hard to see the dough against the inside of the Dutch oven, which has been preheated to 500 degrees. Then the dough is turned into the very hot pot, and you slash a square onto the top of the dough. You are aware that the pot is very hot, and it would be quite easy to burn your arm, but, amazingly, that doesn't happen.
After 20 minutes in the oven (now turned to 450), the lid is removed, and you see a blonde, shiny loaf. Not ready, but looking better than you thought it would look.
After another 20 minutes of baking with the lid of the Dutch oven off, out comes a perfectly respectable looking loaf of bread. I will now admit that in my years of baking bread, including a number of "sourdough" loaves, I have never before had the courage to trust entirely in wild yeast. Even with my sourdough recipes, I've always added at least a pinch of yeast because I never really believed that the so-called "natural" yeast that's supposed to be floating around in the air would really do the trick. Why chew willow bark when you can buy aspirin? That was my theory. But here's my willow-bark, natural-yeast bread, and it looks pretty good.
Not only that, but it tastes pretty good too. It actually tastes better than pretty good. The crust is maybe the crustiest I've ever achieved, and it was done without misting, ice cubes, boiling water, or any of the other ways I've tried to get that burst of steam. Full of holes, flavorful, chewy, it's the kind of bread that makes you realize that a diet of bread and water wouldn't necessarily be a punishment.
And this is only the first, most basic loaf of bread! I could still make an olive loaf, or a walnut loaf, or even croissants! Not to mention the last half of the book, which consists of recipes using bread (bread salad, for example, or "Nettle Fritatine"). Well, I may never make it to the nettles. I'm glad to have this blog, which kept me honest. If I hadn't blogged my progress (very slow progress), I probably would have given up on Day 3 or 4. But I'm glad I stuck with it, and, if you have a couple of weeks without much to do and a willingness to throw a lot of flour down the disposal, I encourage you to do the same.

Thursday, November 08, 2012

Tartine Bread: Day 10


I think it's Day 10, although I'm no longer completely sure. At any rate, the proto-leaven actually seems to be turning into a real leaven, and there is a discernible rise-and-fall routine to it now. I'm going to give it a few more days, and then it's time to try a loaf of bread this weekend! That will be a long process, with, I hope, a lot of illustrative photos. I especially hope for a good result. Here is yet another factoid about sourdough. It is estimated that only about 1% of yeasts have been identified. Questions: How the heck do they know that? And who is doing the identifying? And are people actually on the lookout for more? Like elements?

Saturday, November 03, 2012

Tartine Bread: Days 5, 6 and 7


The starter is definitely in the fermenting stage, but is not yet "rising and falling in a predictable manner." In fact, it's not really rising and falling at all. That seems to be because the "balance of yeast and bacteria" is not yet firmly established. Did you know that the mascot of the San Francisco 49'ers is "Sourdough Sam"? I didn't. Did you know that "sauerteig" means "sourdough" in German? I don't think I knew that, but it's not really a surprise.

Tuesday, October 30, 2012

Tartine Bread: Days 3 and 4

After another day, the mixture is less brown and more bubbly. Both of these traits are satisfying, since the brownness really did not look appetizing. The bubbliness assured me that things were working as they should be.
This picture was taken after I stirred up the goop. It felt satisfyingly thick and full of activity.
This is the part that bothers my thrifty (sometimes) soul. You have to dump out almost all of the active goop, and add more flour and water. By the time I'm ready to make bread, I figure I'll have thrown away about 10 pounds of flour. Since there's very little actual bread-making activity going on around here, perhaps you'd like some random information about sourdough. (Robertson doesn't like to call it sourdough because he doesn't like sour bread, and bread made with "sourdough starter" doesn't have to taste sour. He just calls it a starter, or a "leaven.") If you want to Frenchify it, you could call it "levain." It's not really yeastless. The starter works because it captures wild yeast that's floating around in the air. Everywhere. Yes, in your house too. Rumor has it that you can speed up the sourdough process by spitting into the mixture. I swear that I didn't do that.

Monday, October 29, 2012

Tartine Bread: Day 2


Nothing much has happened on day 2, except the color is browning and unappetizing. At this point, I guess you take it on faith.

Sunday, October 28, 2012

Tartine Bread: Day 1

I have not been quite as lazy as the time between posts might lead you to suspect. I have made breads, but they've all been repeats of breads that I've already written about. Also, my younger daughter gave birth in August to my first grandchild, and Jim and I are taking care of him until his coveted slot in infant daycare opens up. Meanwhile, I've been staring at this book cover, telling myself I really should start this bread:
It's been nearly two years since I got Tartine Bread for Christmas. In the intervening months, I've started reading it probably a few dozen times, and always felt rather dispirited about the time and effort it was going to take to get going with the bread. Every time I read the first chapter, about Chad Robertson's quest for the perfect bread, I'm amazed at how much time and energy he spent looking for ways to blend the most mundane ingredients--flour, salt, and water--into a thing of beauty. He traveled from Northern California to Provence to the French Alps to Bourdeaux back to the northern California countryside, and finally to San Francisco, where he opened his now-famed bakery. His book, he says, is a "baking guidebook to get you where you want to go." I'm not sure where I want to go, but I've now taken the first step."
My first step is mixing a goop made of bread flour, whole wheat flour, and water. And there it will stay for a few more days until bubbles form around the sides and on the surface. We'll see.

Sunday, July 08, 2012

Russian Black Bread

It's been about three months since I've posted on this blog, and several of you were nice enough to check in with me to ask if I was feeling all right. In my defense, I went on a 3-week trip to Russia, Estonia, and Finland in May and June. Then I went on a road trip to South Dakota (Mount Rushmore! Herds of buffalo! The Corn Palace!) for a week. But I've been back for a while, and I figured I'd better post something before my excuses started to molder.
Because I ate so much good black bread in Russia and the other nearby countries, I wanted to try my hand at making some. I assumed that the black color would come from pumpernickel flour. But, at least in this recipe, from Smitten Kitchen, it comes from molasses, chocolate, and espresso powder. I have no idea how authentic this bread is. Smitten says her husband is Russian, and her mother-in-law is a good Russian cook, but this recipe is from The Bread Bible, by Beth Hunsberger. How can there be two cookbooks called The Bread Bible? Doesn't the name of the cookbook get copyrighted? I'm going to research that one day, but not today.
Authentic or not, Russian or not, this recipe makes a fine bread. It's not hard to make, but it does have the drawback of calling for about 32 ingredients. I exaggerate, of course, but not by much. And, unless you bake a lot of bread, there are ingredients you're not likely to have on hand. White and whole wheat flour, yes, but rye flour? Bran? Espresso powder? Maybe not. I actually had everything in my pantry or freezer except for shallots. My advice is not to omit the shallots--although I don't recall eating any bread in Russia that had that onion-y taste, I liked it a lot. By the way, although you could taste the shallots, the chocolate and espresso weren't obvious flavors in the finished product, although I think they added some depth.
Hmmm. It looks a little nasty, doesn't it? I mixed it using the flat beater, and then switched to the dough hook, but it's a heavy dough, and it required a little hand kneading. (This is one of those breads that could be made pretty easily without a stand mixer, and it would be good exercise for your upper arms, for sure!
The recipe makes two good-sized loaves. I made one in a loaf pan, and the other into a boule.
What did I do with these two loaves? They were the solid base for a Russian dinner party. I cut the loaf in thin slices and used them as the base for some Russian appetizers: spread thickly with unsalted butter and sprinkled with caviar, onions, and hard-boiled eggs (yum); spread thickly with cream cheese and chives and topped with smoked salmon (yum); and topped with pickled herring (blech). We had shots of vodka straight from the freezer, of course. Hа здоровье!!
The other loaf went along with dinner: chicken shashliki with traditional tomato sauce, beet salad with yogurt and dill dressing, and butter-steamed potatoes (also known as molodaya kartoshka v masle). For dessert, I made strawberries Romanoff (not truly Russian, but a good dessert anyway.) I also want to try Estonian black bread and Finnish black bread. But maybe I'll wait a bit for those. Hopefully it won't be another three months.

Saturday, April 07, 2012

Oatmeal Buttermilk Bread


I saw a handsome loaf of oatmeal bread at Sun Street Breads, one of the best bakeries in Minnneapolis. I almost bought a loaf, and then I remembered that I was supposed to be a bread baker, and I hadn't baked a loaf of bread in a long time. I had some buttermilk, left over from another project, in the refrigerator, so I decided it would be an oatmeal buttermilk bread.

A nice thing about baking yeast bread with buttermilk is that you can just substitute it ounce-for-ounce for milk, and you'll get a similar, but slightly tangier, result. (Things are trickier when you try to substitute it for milk in a quick bread--you have to decrease the baking powder and increase (or add) baking soda).


As I was making this bread, and marveling over how the oatmeal changed from big rough flakes to a porridge-like consistency after just a brief soak in water, I wondered why I'd never made oatmeal before. But the search function on my blog showed me that I had--twice, in fact.

The first time I made it, back in 2007, I was inspired by Rose's mention of Jeffrey Hamelman's oatmeal bread, which she made for her father. I couldn't find Hamelman's recipe, so I made a different version, which gave me no end of trouble. I ended up with a sadly misshapen loaf, and complained bitterly about the ends, which looked like, I said, giant belly buttons. Then, a few months later, I made a different version that Rose had on her blog--one with honey and flaxseed. I was pleased with that one.


Now, five years later, I own the Jeffrey Hamelman book, Bread, that has the recipe Rose used for her father's birthday, and which inspired me in the first place. The up side of having an increasingly faulty memory is that so many things come as surprises! If I'd remembered this whole series of events when I first got Hamelman's book, I probably would have just made the oatmeal bread then (without buttermilk, since his recipe calls for sweet milk), and I wouldn't have been so delighted to find out that I'd finally made the bread I was trying to make way back when. Now I'm not only happy with the bread, I'm happy to discover that it's apparently been on my to-do list for five years.


I can see why Rose's father liked this bread so much. It's very likeable. Excellent as a sandwich bread, it really shines as toast. So much so that my groan when my alarm clock goes off at 6:00 soon turned to a smile, and I jumped out of bed: toast for breakfast! Yay!

Buttermilk Oatmeal Bread
adapted from Bread, by Jeffrey Hamelman.

1 lb, 10 oz. bread flour
6 oz. whole-wheat flour
5.3 oz. rolled oats
2 cups water
1 cup buttermilk
2.4 oz. (3T) honey
2.4 oz. (5 1/2 T)canola oil
.7 oz (3 1/2 tsp.) salt
.18 oz. (1 1/2 tsp) instant dry yeast

Place the oats in a mixing bowl. Add the water, and let stand for 15 or 20 minutes to soften. Add all the remaining ingredients to the bowl. Using a dough hook, mix on low speed for 3 minutes until thoroughly mixed. Turn the mixer to medium-low and mix for another 3 to 5 minutes.

Let rise for one hour. Fold the dough once during this rising, using a letter-style fold.

Divide the dough in half and shape into loaf pans. Brush the tops of the bread lightly with water, and press oatmeal gently onto the tops of the loaves. Cover the loaves, and let rise for another 1 to 1 1/2 hours.

Preheat oven to 450 degrees, using a pizza stone if possible, and preheating the stone as well. Put 1/2 cup ice cubes on a preheated tray or pan in the oven, and put the loaves on the stone (or on the oven rack). After 15 minutes, lower the temperature to 400 degrees. Bake 30 to 40 minutes.

Monday, February 20, 2012

Za'atar Flatbread


I wasn't going to blog about this bread because it's embarrassingly easy to make, as long as you have the za'atar (or zatar--or, for that matter, zaatar, zatr, zattr, zahatar, zaktar or satar).


If you have the spice mixture, however you want to spell it, you can make a close approximation of the bread just by buying pita or other flatbread, brushing it with olive oil, sprinkling the za'atar mixture on top, and baking it for 5 minutes or so. I got my mixture at Penzey's, but it's also available at a number of on-line sources. (When I was at our local Penzey's store, I remembered that I wanted this spice, but I couldn't remember what it was called. I asked if they had any Qatar. The nice man at Penazey's didn't say, "You moron, that's a country, not a spice." Instead, he kindly led me to the za'atar and said, "I think this is what you want." The Penzey's mixture has thyme, sumac, sesame seeds, and salt, but other mixtures may also contain oregano, mint, marjoram, or savory. There are many recipes available via the internet, the source of all knowledge.

I simply used the master recipe in Artisan Bread in Five Minutes a Day, by Jeff Hertzberg and Zoe Francois. I halved the recipe, and used about two-thirds of that to make the flatbread. (The other third is being made today into a mini-boule that will be sliced and used to top some onion soup).


The dough is spread out flat, punched with your fingers, and doused with olive oil. Then you liberally sprinkle on the za'atar mixture and a little more salt (there is already some salt in the za'atar, so you want to be careful not to overdo the added salt).


I baked it for about 25 minutes at 425 in a convection oven, cut it into small wedges, and served it with hummus. Now za'atar is my new favorite taste sensation. It's salty, a little sour, herbal, and nutty. Artisan Bread in Five suggests using it in a kabob marinade or in fattoush--both sound great for summer cooking.  Alas, summer is not yet here, but I hope the zatar will keep for a few more months.

Tuesday, February 07, 2012

Cranberry Pecan Boule - and a Surprise Present


I made strict rules this past Christmas about buying presents for me. Not because I don't think I deserve them--no, not at all. It was because I had already picked out a whole boatload of things that I wanted. (To be perfectly honest, I'd already bought them and just gave them to Jim to wrap). But there's a limit to how many geegaws you can buy for yourself, and I had exceeded the limit. So I told Jim, no more! But three days before Christmas, a large box appeared in the mail, addressed to me. I opened it - it was addressed to me, after all, and found this:


It's a Brød &Taylor Folding Proofer. "Jim," I said, "you were not supposed to buy me anything else." He claimed he didn't. I didn't believe him. He swore that he didn't. I asked him who else would buy me a bread proofer. "Maybe it was Rose," he guessed. "That's crazy," I told him. But then I remembered that I had read something on Rose's blog about a proofer. So I called Woody and asked him if he'd ever heard of a bread proofer. "Oh, did you get yours? I just got mine too," he said cheerfully. Mystery solved. Thanks, Rose. And thanks, Brød &Taylor, too.


The proofer came with two recipes: country wheat sandwich bread and cranberry pecan boule. I voted for cranberry pecan. Since nobody else voted, I won. It starts with a poolish starter, which sits in the proofer for 4 hours at 74 degrees. I loved it that it was 74, and not 75.


Usually a poolish sits in my chilly kitchen overnight. In the summer, it ferments for a few hours in my warm kitchen and then overnight in the refrigerator. It's all very casual, which I like. But I also like knowing that I can end up with a bubbly poolish in just 4 hours at 74 degrees. If I get very brave sometime, I may try it at 75, or even 76 if I'm feeling very devil-may-care.


It's a very stiff dough. I kneaded it for almost 10 minutes in my new KitchenAid and had visions of watching another mixer go kaput. But it chugged along (it is still under warranty, so I don't really expect it to go under until 24 hours after the warranty expires).


The dried cranberries and chopped pecans seemed to have an antisocial personality disorder. They did not want to mix. (If you make this bread, I recommend that you spend more time than I did poking cranberries back into the dough--the berries on the outside of the bread were burned and inedible, while the berries that had been forced inside were tart-sweet and delicious.


Into an oiled bowl and back into the proofer it goes. This time the proofer goes up to 80. When I thought about it, I realized that my kitchen is almost never 80 degrees. (I do have a proofing setting in my oven, but it's 85 degrees, which is the high end of ideal temperatures for proofing).


After this proofing, the dough gets shaped into a ball, and put in a bowl or colander. I used a lightly floured banneton. Then it rises again - at 80 degrees exactly - for another hour.


After 25 minutes in the oven. You can see how black the cranberries got. But it's still a handsome loaf of bread. And delicious, too.


But wait, there's more! This little machine is not only a proofer, it also makes yogurt and melts and tempers chocolate. Or so it says. I may very well try it for yogurt, but I'm not sure I'd drag it out to melt chocolate. Although, in fairness, "dragging it out" is not a big ordeal. It folds into a small rectangle, so it doesn't take much space, and it's easy to put together. This gadget definitely belongs in the "luxury" category, not the "essentials." But I'm tickled to have it, and wouldn't be surprised if it turned out to be something I convince myself I could no longer do without. Especially in winter, when dough sometimes is as reluctant to rise as I am to go outside.

Cranberry Pecan Boule

Poolish Starter:
3/4 cup (4.4 oz.) unbleached bread flour
1/2 cup water (4.4 oz.) (70 to 78 degrees)
1/4 tsp instant yeast
Set the proofer to 74 degrees and add 1/4 cup of water to the wawter tray. Mix all the ingredients for the poolish into a large mixing bowl. Place the bowl into the proofer for 4 hours until it inflates into a bubbly, soft, and sweet-smelling sponge.

Dough Ingredients:
All of poolish starter
1 cup (8.1 oz.) water
1 tsp. instant yeast
2 1/4 cups (10 oz.) unbleached bread flour
3/4 cup (3.6 oz) whole wheat flour
2 tsp. salt
1/2 cup dried cranberriese
1/2 cup toasted pecans, coarsely chopped

1. Increase proofer temperature to 80 degrees.
2. Add the water to the poolish and stir it around to loosen it up. Add the yeast, flours,and salt. Stir until a rough dough forms. Knead dough on counter or in stand mixer, using the dough hook, until a smooth and elastic dough forms.
3. Add the cranberries and pecans and work them into the dough until they are evenly distributed throughout.
4. Place the dough into a lightly oiled bowl and place in proofer. Let the dough rise for 60-90 minutes or until it has doubled in bulk.
5. Turn the dough out onto a lightly floured counter and shape the dough into a tight round ball.
6. Place the dough ball seam side up into a well-floured dough rising basket or a bowl/colander lined with a heavily floured linen cloth. Dust the exposed bottom of the loaf with flour and place back inproofer, still set at 80 degrees. Let the dough rise 1 hour or until it has almost doubled inj bulk.
7. Prepare the oven for baking an hour before you are ready to bake. Place a bakingh stone in the middle of the oven with a skillet or rimmed baking sheet on the bottom rack. Preheat to 500.
8. Turn the dough out onto a baking peel or inverted baking sheet lined with parchment. Score the top of the loaf and quickly place the loaf onto the hot baking stone. Add 1/2 cup of water to the skillet and close the door. Bake for 5 minutes, then lower the oven temperature to 450, and continue to bake foro 25-30 minutes or until the loaf is a deep brown color and sounds hollow when tapped on the bottom.
9. Allow the loaf to cool completely before slicing.

From Brød &Taylor Folding Proofer Supplemental Manual, crediting Melissa Langenback, thebakersguide.com.