Monday, February 16, 2009
I didn't get around to baking anything this weekend, but, fortunately, as a state employee I get President's Day off. Pondering what bread to bake next, I was looking through more whole grain breads when I said to myself, Hmmph. I want white bread. So I made really white bread. Not only does it have white flour, but it also has potato flour and milk and powdered milk. All manner of white things.
You can call this sandwich bread if you want. But you can also call it pain de mie , which sounds ever so much better and more hoity-toity than white sandwich bread. The recipe is from King Arthur's website, and I chose it because I had some potato flour that I've had for a while and is probably getting to the point where I should either use it up or throw it out. Before I started baking bread, I thought flour lasted forever, so I would have had no qualms about using 20-year old flour (not, I hasten to add, that the potato flour is anywhere close to that), but now I wouldn't dream of doing such a thing.
I had to do quite a bit of searching to find my old pain de mie pan. I got the pan used on eBay.com during the period that I was buying a lot of baking equipment. I remember balking at the purchase of a new pain de mie pan. They're quite expensive, and I figured that I'd never use it again, so I could only bring myself to spend a few dollars, plus shipping. I fell in love with it when it arrived--it's heavy and tall and looks very French.
This is an easy bread to mix up, except that my friend June put a curse on me. We went out for dinner on Saturday--June and I, and our husbands too--and at some point June asked me if the bread I made with the dough hook turned out grainier than the dough I kneaded by hand. I looked at her as if I didn't know what she was talking about (because I didn't), and said I had never noticed such a thing. And, I said, it doesn't make sense because the dough hook kneads more thoroughly than you can knead by hand. But this dough turned out to have little lumps in it. Because that's never happened before, I can only think that it's June's fault, and that she must have put a hex on me or my dough hook. At first I thought there were only a few little lumps, and I tried to carefully pick them out by hand, but then I saw that there were many. If I don't blame June, I blame the potato flour for forming what looked like little mashed potato lumps.
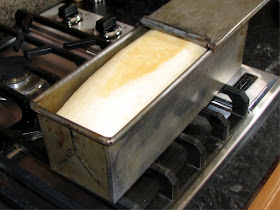
I love baking in this lidded loaf pan! The top presses down on the bread while it's baking, so it turns out almost square. I think that the idea is that the crumb becomes more compressed this way, which is why it's called pain de mie, which means bread of crumb, more or less. I grew up thinking it was called a Pullman loaf, which is not as French or romantic. I could look up why it's called that (because it was served on a Pullman car?), but I think I'll leave that for another time.
I was feeling a little insecure about this bread, because of the lumps and all, so I decided to make up for the lumps by taking its temperature so at least the bread's lumps would be the proper temperature.
The trouble with sticking the thermometer in the middle of the bread is that it leaves a hole. I don't like the idea of a hole in the middle of the bread, which is why I don't usually do it, and it turned out to be 190 degrees on the first testing, so it was a letdown anyway.
For a plain white loaf, this is seriously good bread. The little potato-y lumps that I was so concerned about disappeared in the baking, leaving nothing in their wake but a fine, delicate crumb. I didn't make sandwiches, but it's clear that this bread would be perfect for sandwiches, and even better for grilled sandwiches. It will probably make excellent toast, a hypothesis which I will test tomorrow morning. And yet...I have to admit that this plain white bread, good as it is, just doesn't have the complexity of the whole wheat bread which I've been dissing. The lesson seems to be--enjoy the bread you're eating now.
Monday, February 16, 2009
Sunday, February 08, 2009
Whole Wheat Bread
Saturday, February 7, 2009
You know how I'm always saying that all you have to do to cook is know how to read? Well, maybe I'm not always saying it, but I sometimes say it, and baking this bread taught me again that all you have to do to screw something up is not read the directions. Aside from baking scones, sticky rolls, chocolate babka, and sour cream coffee cake, I've been on a healthy-eating quest this year, which meant that I had to up the whole grain quotient in the breads I've made. This one is from one of my Christmas books, Bread, by Jeffrey Hamelman.
This book is unusual because it's really directed at least as much to the professional baker as the home baker, and each recipe tells you how to make, say, 25 loaves as well as 2 or 3. No, that's not the mistake I made--even in a caffeine-deprived state, I would think something was amiss if tried to mix up 20 pounds of flour.
But the book's ingredient sections for individual recipes are divided into three sections: Overall Formula, Pate Fermentee (or Levain), and Final Dough. This is too much information for me. What do I care about the overall formula? I just want to know how to mix things together.
I made the Pate Fermentee Friday night--no problem.
And by Saturday morning, it was nicely bubbling and ready to mix in the rest of the dough.
That's where I was done in by the Overall Formula section. So instead of mixing in 1 lb., .6 ounces of water, I poured in 1 lb., 5.8 ounces. As I kept pouring, and pouring, and pouring, I finally said doubtfully to myself, this seems like an awful lot of water. So I looked at the recipe again and saw my mistake. So there I was with a pound of whole wheat flour, a pound a bread flour, and a ton of water. I thought of possible ways to rescue the situation, but they were all too messy and complicated, so I just dumped the whole mess out.
And it was a mess. Have you ever tried to put a couple of pounds of gluey glop in the garbage disposal?
I was so disheartened that I almost gave up on the idea of baking bread this weekend, but there was my pate fermentee, cheerfully bubbling away, so I decided to give it another go. This time I used a blank piece of paper to cover up the "overall formula" section so I couldn't even see it, but I was feeling quite put out with Mr. Jeffrey Hamelman.
By the time I'd put the two loaves in bannetons and they'd risen nicely, I was feeling more kindly toward Hamelman and decided he probably didn't pull the wings off flies after all, and might be a perfectly lovely man.
I slashed one banneton and put the other in the oven without any cutting, hoping that it would stay in one piece, and it did. I liked the looks of both of them; really, I'm not sure which is more attractive.
When we ate our slices of still-warm bread, though, I was a bit disappointed--very nice and all, but still, it was just a piece of whole wheat bread.
As I was leafing through the book, I came across a section where Hamelman was rhapsodizing about bread: he said that bad bread tasted good when it was warm, but good bread didn't really come into its own until the second day. Oh, please, I thought. It's not like it's fine wine. But when I had another piece of bread on the second day, I thought he might be on to something: I could taste the slight tang from the pate fermentee and detect the sweetness from the honey. But maybe I just didn't want to claim a loaf of bad bread.
Jeffrey Hamelman's Whole-Wheat Bread
For Pate Fermentee:
8 oz. bread flour
5.2 ounces water
.2 oz. salt (1 tsp.)
1/8 tsp. instant dry yeast
For Final Dough:
1 lb. whole-wheat flour
8 oz. bread flour
1 lb., .6 oz. water
.4 oz. salt (2 tsp.)
.13 oz. instant dry yeast (1 1/4 tsp.)
1 oz. honey
1. The night before baking, mix the pate fermentee. Mix yeast, water, flour, and salt until smooth. Cover the bowl with plastic wrap and let stand for 12 to 16 hours.
2. When ready to make the bread, place all ingredients for final dough in the mixing bowl of a stand mixer with a dough hook. Mix on low speed about three minutes. As dough starts to come together, add the pate fermentee in chunks. Mix for another three minutes on medium speed.
3. Put in bowl and cover with plastic wrap. Let rise for a total of about two hours. After one hour, remove bread from bowl and fold it over. Put back in bowl and cover with wrap.
4. Divide into two pieces and shape into rounds. Cover with plastic wrap and let rest about 15 minutes. Shape into round or oval loaves, or place into floured bannetons. Cover with plastic and let rise another 1 1/2 hours. (The dough can also be put in a loaf pan or shaped into rolls).
5. Transfer the risen loaves onto a baking sheet lined with parchment, or place directly on baking stone. You can add steam either by pouring a cup of boiling water or about 1/2 cup of ice cubes into a pan on a lower shelf of the oven. Bake in a preheated 450-degree oven for 30-40 minutes. Turn heat down by 25 degrees if bread starts to get too brown.
Thursday, February 05, 2009
Vermont Cheese Bread
Thursday, February 5, 2009
Today was ChiliFest at the State Public Defender's Office. My friend Cathy is the unofficial Social Director of our office, and every now and then, she just has to have some kind of party. Today was a chili pot luck, with Ngoc bringing Havana chili, Andrea whipping up a turkey chili, Jodie with a healthy eggplant-based chili, and Cathy herself bringing a giant crockput of your regular hamburger and kidney bean variety. Ben was supposed to be responsible for the white chicken chili, but his kids were being difficult last night, and he opted to get some sleep instead of stirring chili. Probably not an unreasonable choice. Sara made corn muffins, and I brought cheese bread. There were plenty of desserts: a chocolate-coconut bundt cake, and bars galore (in Minnesota, there is a separate category of dessert called "bars," which is pronounced sort of like "barse.") All potlucks in Minnesota have barse for dessert, and ours was no exception: Toll House, lemon cheesecake, ginger, and brownies. The non-cooks had the option of bringing drinks or condiments.
I turned to the Artisan Bread in Five Minutes a Day book again, and I was impressed with the results. I made the dough Tuesday night and it sat in the refrigerator until this morning. At 7:00 a.m., I dumped it out on the counter.
The master recipe is supposed to make four loaves, so I cut it in half, figuring I'd make one loaf for ChiliFest and another one this weekend. When I divided the dough in half, though, I realized that it made very small loaves, so I changed my plan: I'd bake both loaves this morning and bring the leftovers home for us.
I've had mixed success with the method where you slide the bread from the pizza peel directly on the hot baking stone, but this time it worked, and I didn't burn my hand in the process either.
However, once the breads were in the oven, I realized that I'd completely forgotten to slash the breads with my cute little French knife, so when I turned on the oven loaf to see how they were doing, I saw that they had developed slashes au naturel.
I blame this on my having only one cup of coffee, which was half decaf; this clearly did not provide enough caffeine to get me through an entire recipe without a mistake. And I had even spent a considerable amount of time deciding what slashing pattern I would use. Aha, I thought to myself, in a glass-half-full kind of way, this provides me with a challenge--can I go through the entire day without announcing to everyone that I had screwed up the bread? Almost. I told only one person, and she seemed completely uninterested in my mistake. For the rest of the day, if someone said something about the bread, I just smiled and said not a single word about how it was supposed to have been slashed decoratively.
Oh, and that plan to bring home the leftover bread? It didn't happen. As some of you may know, the fact that something is eaten when it's brought into the communal kitchen in an office doesn't necessarily mean that the food is good; it just means that it was there. But in this case, the bread actually was good. The extra-sharp aged cheddar gave the bread a distinctive, delicious flavor, but it wasn't gooey and greasy as some cheese breads are. It was a perfect complement to four different kinds of chili, but would be good with almost any soup and would probably be an excellent sandwich bread too.
I'm going to include a shortened version of the four-loaf recipe, but I'll put in a plug for buying the book, especially if you, like me, just like to read cookbooks. First, all the recipes are based on a particular method, and it's useful to read about the method before tackling a bread. Second, you may have better luck with some recipes than others. The first bread I tried from this book was too salty, because I hadn't followed my own advice and read through the entire method before trying a recipe--all the recipes advise the use of kosher salt, and I used table salt; two teaspoons of table salt is a lot more salt than two teaspoons of kosher salt. The second recipe, a rye bread, was fine but not spectacular. A buttermilk bread that I tried next was excellent, as have been the brioche and cheddar breads. That's a good enough percentage to justify purchase of the book, I think, especially if you relish the idea of having bread dough on the ready in the refrigerator.
Vermont Cheddar Bread
3 c. lukewarm water
1 1/2 T. instant yeast
1 1/2 T. kosher salt
1 1/2 T. sugar
6 1/2 c. unbleached all-purpose flour
1 c. good quality sharp, aged Cheddar
1. Mix all ingredients, either by hand, or using the dough hook of a heavy-duty mixer. You don't have to knead; just make sure all flour is incorporated. This is a wet dough.
2. Cover, not airtight, and let rest at room temperature about two hours. Dough should rise and start to collapse. Refrigerate in a covered (but not airtight) container, and use within 7 days. (I made the bread on the third day and it had a very slight tanginess).
3. On baking day, cut off a one-pound, grapefruit-sized piece of dough. Dust with flour and shape into a ball. Allow to rest and rise on a cornmeal-covered pizza peel for one hour.
4. Preheat oven to 450, putting a broiler pan or cookie tray (with sides) on the bottom of the oven or the lowest shelf, and a baking stone on the lowest or next-t-the-lowest shelf--depending on where the pan is.
5. Just before baking, slash the bread with a razor or sharp knife. Or not.
6. Slide loaf directly on the hot stone. Pour one cup hot water into the broiler tray and close the oven door. Bake for about 25 minutes.
Sunday, February 01, 2009
Tunisian Spicy Breads (Touarits)
Sunday, February 1, 2009
See, this is what I mean about breads. They can be a little on the brown side, not quite as brown, some thicker than others, some thinner--they don't care. They all taste good, not like some finicky coffee cake.
These filled Tunisian mini-breads are the first thing I've made from Savory Baking from the Mediterranean, by Anissa Helou. As far as I know, they're the first and only Tunisian anything I'ver ever made, but if this is any indication of Tunisian cuisine, I may hunt down some more recipes.
The savory little breads are made with a simple all-semolina flour dough (I used King Arthur's durum flour because it's so much finer than any semolina I've seen at stores). It only has to rest for a while, which can be done while you're making the filling, so you can think of this just a few hours before you want to eat them.
The lovely golden dough is divided in half, and each half is rolled out to a 1/4-inch thickness.
(For someone who fears pastry, I've been doing a lot of rolling out dough lately). I used a biscuit cutter to make 3-inch rounds, then filled half of the rounds with a spicy mix of sauteed onions, red peppers, tomatoes, chili peppers, harissa, cayenne, and salt. With the chili peppers, harissa, and cayenne, it sounds like it would be crazy hot, but each little bread has only about 1 teaspoon of the mixture, and the bread itself modifies the heat of the filling.
The filled circle is topped with a plain one, the edges are pinched to seal and brushed with olive oil. Then they're popped into a 400-degree oven.
There is no picture of these in the book, and I have absolutely no idea what touarits are supposed to look like (they're a "Tunisian spin on r'ghayefs," if that clarifies things for anyone.) But I liked the way mine looked. And I definitely liked the way they tasted. We ate them for dinner, with a salad that wasn't at all Tunisian (greens, pears, goat cheese, and almonds), but it worked out well. They would also make a wonderful appetizer, but you would have to limit people's intake, or they would gobble them up and then not eat your dinner that you worked so hard on.
A word about the cookbook: although I loved the bread, I have a few complaints about the cookbook. First, the ingredients are given by volume, not by weight, and I think they've been translated because there are some weird amounts (1/3 teaspoon?). The water for the dough is not listed in the ingredients; instead, it's listed in the directions, in two different places. The filling instructions tell you to saute the onion over medium-high heat, but if you cooked everything until the red pepper is soft, as you're supposed to, over medium-high heat, it would be a charred mess. Also, there are very few pictures, and the ones that are there are blurry, in black and white, and not particularly helpful. Nevertheless, there are recipes in this book that I've never seen anywhere else--including this one--and if you're interested in expanding your bread horizons, you might want to give this book a try.
TUNISIAN SPICY BREADS
adapted from Savory Baking from the Mediterranean
Dough
3 1/3 teaspoons active dry yeast
3 1/3 cups (473 grams) fine semolina or durum flour
1 1/2 t. fine sea salt or kosher salt
1 1/2 T. olive oil, plus extra for brushing the breads
1 egg
1 cup water
All-purpose flour for kneading and shaping
Filling
3 T. olive oil
1 medium onion, finely copped
2 medium tomatoes, finely chopped (I use cherry tomatoes in the winter)
1 medium red bell pepper, finely chopped
2 small serrano peppers, seeded and finely chopped
1 t. harissa (available in some supermarkets and in specialty groceries)
1/2 t. cayenne pepper
Salt
1. In mixer bowl with dough hook attachment, combine flour, yeast, olive oil, egg, and salt. Gradually add water and knead for 2-3 minutes. (The kneading can also be done by hand).
2. Cover bowl and let dough rest about 15 minutes. Knead another 2-3 minutes, until dough is shiny and smooth. Cover dough with damp kitchen towel and let rest while you're making filling.
3. For filling, heat oil in saute pan over medium heat. Add onion and cook until golden. Reduce heat to medium-low and add tomatoes, bell and serrano peppers, harissa and cayenne. Salt to taste and cook, stirring occasionally, until bell pepper is soft. Remove from heat and set aside.
4. Divide dough into two pieces and shape each into a bowl. Let them rest, covered with plastic wrap, for 15 minutes.
5. Preheat oven to 400. Roll out one ball of dough to 1/4-inch thickness. Cut out as many circles as possible. (I used a 3-inch biscuit cutter). Place about 1 teaspoon of the filling in the middle of half of the circles. Top with plain circle, and pinch the edges to seal. Place on baking sheet lined with parchment paper.
7. Repeat with second ball of dough. Then gather all scraps together and cut out more circles until dough is gone.
8. Brush with olive oil and bake for 12-15 minutes until crisp and golden. Cool on wire rack. Best if eaten warm (they can be reheated in a 200-degree oven).
Sour Cream Coffee Cake
Saturday, January 31, 2009
Our last Saturday coffee-and-doughnut hour for the year, and the last Saturday I have to rouse myself in the middle of the night to bake a not-doughnut something. (Sometime I will try doughnuts, I think). I asked for suggestions, and I got some good ones. Melinda thought I should make some "easy-peasy" homemade Danish. I asked her what planet she lived on. Oriana sent me a good-sounding recipe for bran muffins, which actually did look easy, and I could have made them ahead of time, but I feared two hours of jokes about bowel movements if I made something with bran (or prunes for that matter). Maura sent me some fabulous recipes, one for sunny-side-up apricot pastries made with homemade puff pastry, which she also described as easy. This makes me realize that many people have a different definition of "easy" than I do. Maura also sent me directions for baking dozens upon dozens of kolache, which she herself has done--with multiple fillings. I wish that Maura would become my personal baker. Finally, she suggested sour cream coffee cake, which seemed perfect. Besides, I love it. Now Maura said she'd had good luck with the recipe from The Silver Palate, and I should have just used that recipe, no questions asked, but I started thumbing through cookbooks and decided to try the recipe from The New Best Recipe, which had four eggs, a cup and a half of sour cream, and nearly two sticks of butter, plus pecans, brown sugar, and cinnamon. How could I go wrong?
I didn't exactly go wrong, but I didn't exactly go right either. The Best Recipe coffee cake is mammoth, and I took it out of the oven after an hour because I feared burning. It might have been perfect if I had kept it in for just five minutes more, but it was ever so slightly underdone. That is, it was not perfect. If I'm going to get up at 6:30 on a Saturday, I want perfection!
The batter was lovely, rich, and silky, and it gave me high hopes. It was easy to layer the batter and the streusel, but it ended up nearly filling the bundt pan. (The directions said to use a tube pan, but not one that came apart, like an angel food cake pan, so the bundt pan seemed the only option).
In making the streusel, I came scarily close to using curry powder instead of cinnamon, probably because I was operating on only one cup of coffee, so I spent quite a bit of time trying to imagine what a curry powder streusel might taste like and wondering if I could possibly convince people that I'd done it on purpose, and it was all the rage in New York. I decided no.
One reason I like baking bread better than anything else is that it's not so fussy about the precise moment it's done. Five minutes either way, and no one's the wiser. But pastry and cakes--they're spoiled children. Take them out one minute too soon and they're squishy and spongy. Leave them in one minute two long and they burn or dry out.
The directions for this coffee cake are to bake for 50 to 60 minutes. Usually my convection oven, even set 25 degrees lower than recommended, gets things done early. I checked the cake after 50 minutes, and a lot of batter clung to the knife. Eight minutes later, it seemed to be good.
After it cooled a bit and I up-ended it on a plate, I had my doubts. It just didn't look quite solid enough. But I'd passed the point of no return, and I figured that everyone else was on their first cup of coffee so they wouldn't be that observant. Just don't mention that it might not be quite done, I instructed myself. Apparently I routinely ignore my instructions because I announced that it wasn't done to anyone who would listen. They didn't seem to care.
It was our neighbor Doug Logeland's birthday on Saturday, so he got a candle on his slightly underdone coffee cake.
Cook's Illustrated Sour Cream Coffeecake
Streusel
3 3/4 ounces unbleached all-purpose flour
5 1/4 ounces sugar
3 1/2 ounces dark brown sugar
2 T. cinnamon
2 T. cold unsalted butter
1 c. pecans, chopped
Cake
4 large eggs
1 1/2 cups sour cream
1 T. vanilla
11 1/4 ounces unbleached A-P flour
8 3/4 ounces sugar
1 T. baking powder
3/4 t. baking soda
3/4 t. salt
12 T. unsalted butter, softened, cut into 1-inch cubes.
1. Streusel: Place flour, sugar, 1/4 cup of brown sugar, and cinnamon in a food processor and combine. Transfer 1 1/4 cups of this mixture to a small bowl, stir in the remaining 1/4 cup brown sugar, and set aside (streusel for inside cake). Add butter and pecans to remaining dry ingredients in food processor. Process for about 10 pulses. Set aside (streusel for top of cake).
2. Cake. Put oven rack to lowest position and preheat to 350. Grease 10-cup capacity tube or bundt pan. Combine eggs, 1 cup sour cream, and vanilla in medium bowl.
3. Combine flour, sugar, baking powder, baking soda, and salt in mixer for about 30 seconds at low speed. Add butter, 1/2 cup sour cream and mix until moistened. Increase speed to medium for 30 more seconds. Decrease speed and incorporate egg mixture in three additions. Increase speed and beat for one minute and mixture becomes aerated and pale in color.
4. Add 1/3 of batter too pan, and smooth evenly. Sprinkle with half of streusel filling. Repeat with batter and streusel. Top with remaining batter, spread evenly, and top with the streusel topping with the nuts.
5. Bake until cake feels firm to the touch and toothpick comes out clean of batter (sugar may cling to tester), 50 or 60 minutes. Cool cake in pan for 30 minutes, then invert on plate. (You can also re-invert so streusel will be on top).